Saddle Adjustments

The Benefits of Proper Saddle Adjustment
Knowing how to adjust a saddle properly is essential for the comfort, performance, and well-being of both the horse and rider. A poorly adjusted saddle can cause pressure points, restrict movement, and lead to soreness or injury for the horse, while also compromising the rider's balance and effectiveness. Proper saddle adjustment ensures even weight distribution, allowing the horse to move freely and comfortably while supporting the rider in a balanced, secure position. Additionally, every horse is unique, with asymmetries and changes in muscle tone over time, so understanding how to make adjustments ensures the saddle fits correctly as these changes occur. Ultimately, a well-adjusted saddle promotes harmony between horse and rider, improving performance and preventing long-term physical issues.
How to Adjust DK Western Saddles
Step-by-Step Instructions:
-
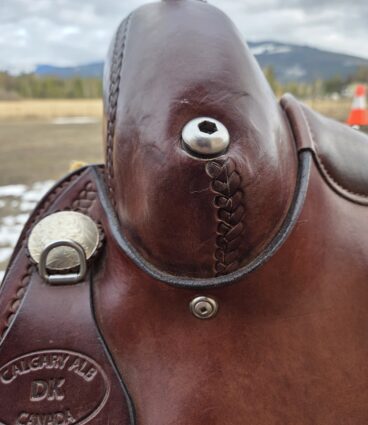
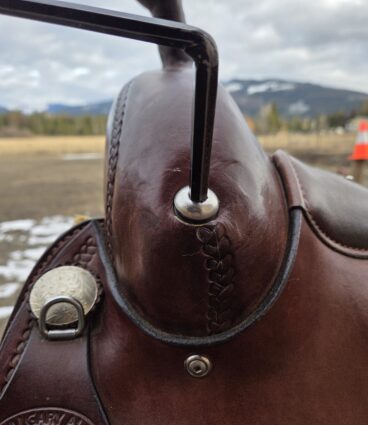
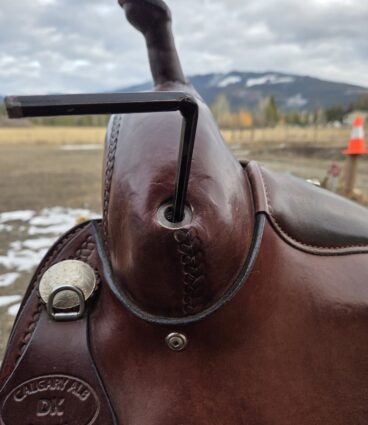
Open the Saddle Bars
- Use the supplied Allen wrench to fully open the bars by turning the bolt counterclockwise.
-
Note: For saddles with plugs instead of conchos:
- Use the large end of the Allen wrench to first remove the plugs.
- Concho covers will swivel to expose the plug.
-
Position Your Horse
- Ensure the horse is standing square on level ground with its head and neck straight.
-
Determine Your Horse's Asymmetries
- Stand directly behind your horse and place your thumbs on either side of the tail dock.
- Slide your thumbs upward to the very top of the dock.
- Assess which thumb is lower; this indicates your horse's weak/low side.
-
Position the Saddle
- Place the saddle on your horse, using a saddle pad. Do NOT girth yet.
-
Ensure the saddle is correctly positioned:
- The front of the saddle should sit directly against the back of the shoulder.
- There should be one fist width between the horse's elbow and the girth.
-
Adjust the Weak/Low Side
- Using the small end of the supplied Allen wrench, insert it into the bolt on the pommel on the determined weak/low side.
- Turn the bolt clockwise for 5 rotations to bring the bar inward.
-
Test Saddle Fit
- Place both hands on top of the saddle horn and apply downward pressure.
-
Observe how much the back of the saddle lifts.
- A perfectly fit saddle should allow 1 to 1.5 fingers of clearance between the rear of the saddle and the horse's spine/back.
- To achieve this clearance, adjust the bars equally on both sides.
-
Fine-Tune the Fit
-
Measure the amount of lift at the back of the saddle (in fingers):
- If the saddle lifts 4 fingers, turn the bolts 4 rotations on both sides.
- Adjust accordingly (e.g., 5 fingers = 5 rotations, 3 fingers = 3 rotations).
- Always adjust both sides equally.
- Note: If the saddle is still too high, bring the bars inward with additional clockwise rotations. If too tight, turn counterclockwise to loosen.
-
Measure the amount of lift at the back of the saddle (in fingers):
-
Girth the Saddle and Reassess
- Girth up the saddle and recheck the 1 to 1.5-finger clearance at the rear of the saddle.
-
If necessary, make additional adjustments:
- Use clockwise rotations to narrow the fit.
- Use counterclockwise rotations to widen the fit.
- Final Girth Tightening: Always tighten the girth on the horse's strong/high side.
Troubleshooting
-
Bars Aren't Turning
- For saddles with plugs, remove the outer plug.
- Note: Saddles with concho covers do not have plugs.
-
Saddle Is Tipping or Leaning to One Side
- This indicates the wrong side was identified as the weak/low side.
-
Fix:
- Undo the 5 rotations on the incorrect side by turning counterclockwise.
- Reposition the saddle and adjust the opposite side with 5 clockwise rotations.
-
Saddle Moves Forward on the Shoulders
- This usually means the saddle is either too wide or too narrow.
-
Fix:
-
Adjust the bars:
- Turn clockwise to narrow the fit.
- Turn counterclockwise to widen the fit.
-
Adjust the bars: